

이 페이지는 아직 번역되지 않았습니다. 영어 버전
Zul'Gurub
Zul'Gurub is a level 60 raid in Stranglethorn Vale in World of Warcraft: Forever, with 10 bosses. Not announced for Forever: Blizzard's raid overview of 20 October names three raids for Forever: Barrow Deeps, Hyjal Summit and Onyxia's Lair. This one is in the game files, but Blizzard hasn't said if or when it comes.
Raid. Levels 60–60 (Forever client: group finder). 20 players (Forever client).
Getting there
- Entrance: Stranglethorn Vale (54.0, 17.6) (Forever client)
- Nearest flight master (Alliance): Booty Bay, Stranglethorn
- Nearest flight master (Horde): Grom'gol, Stranglethorn
Map
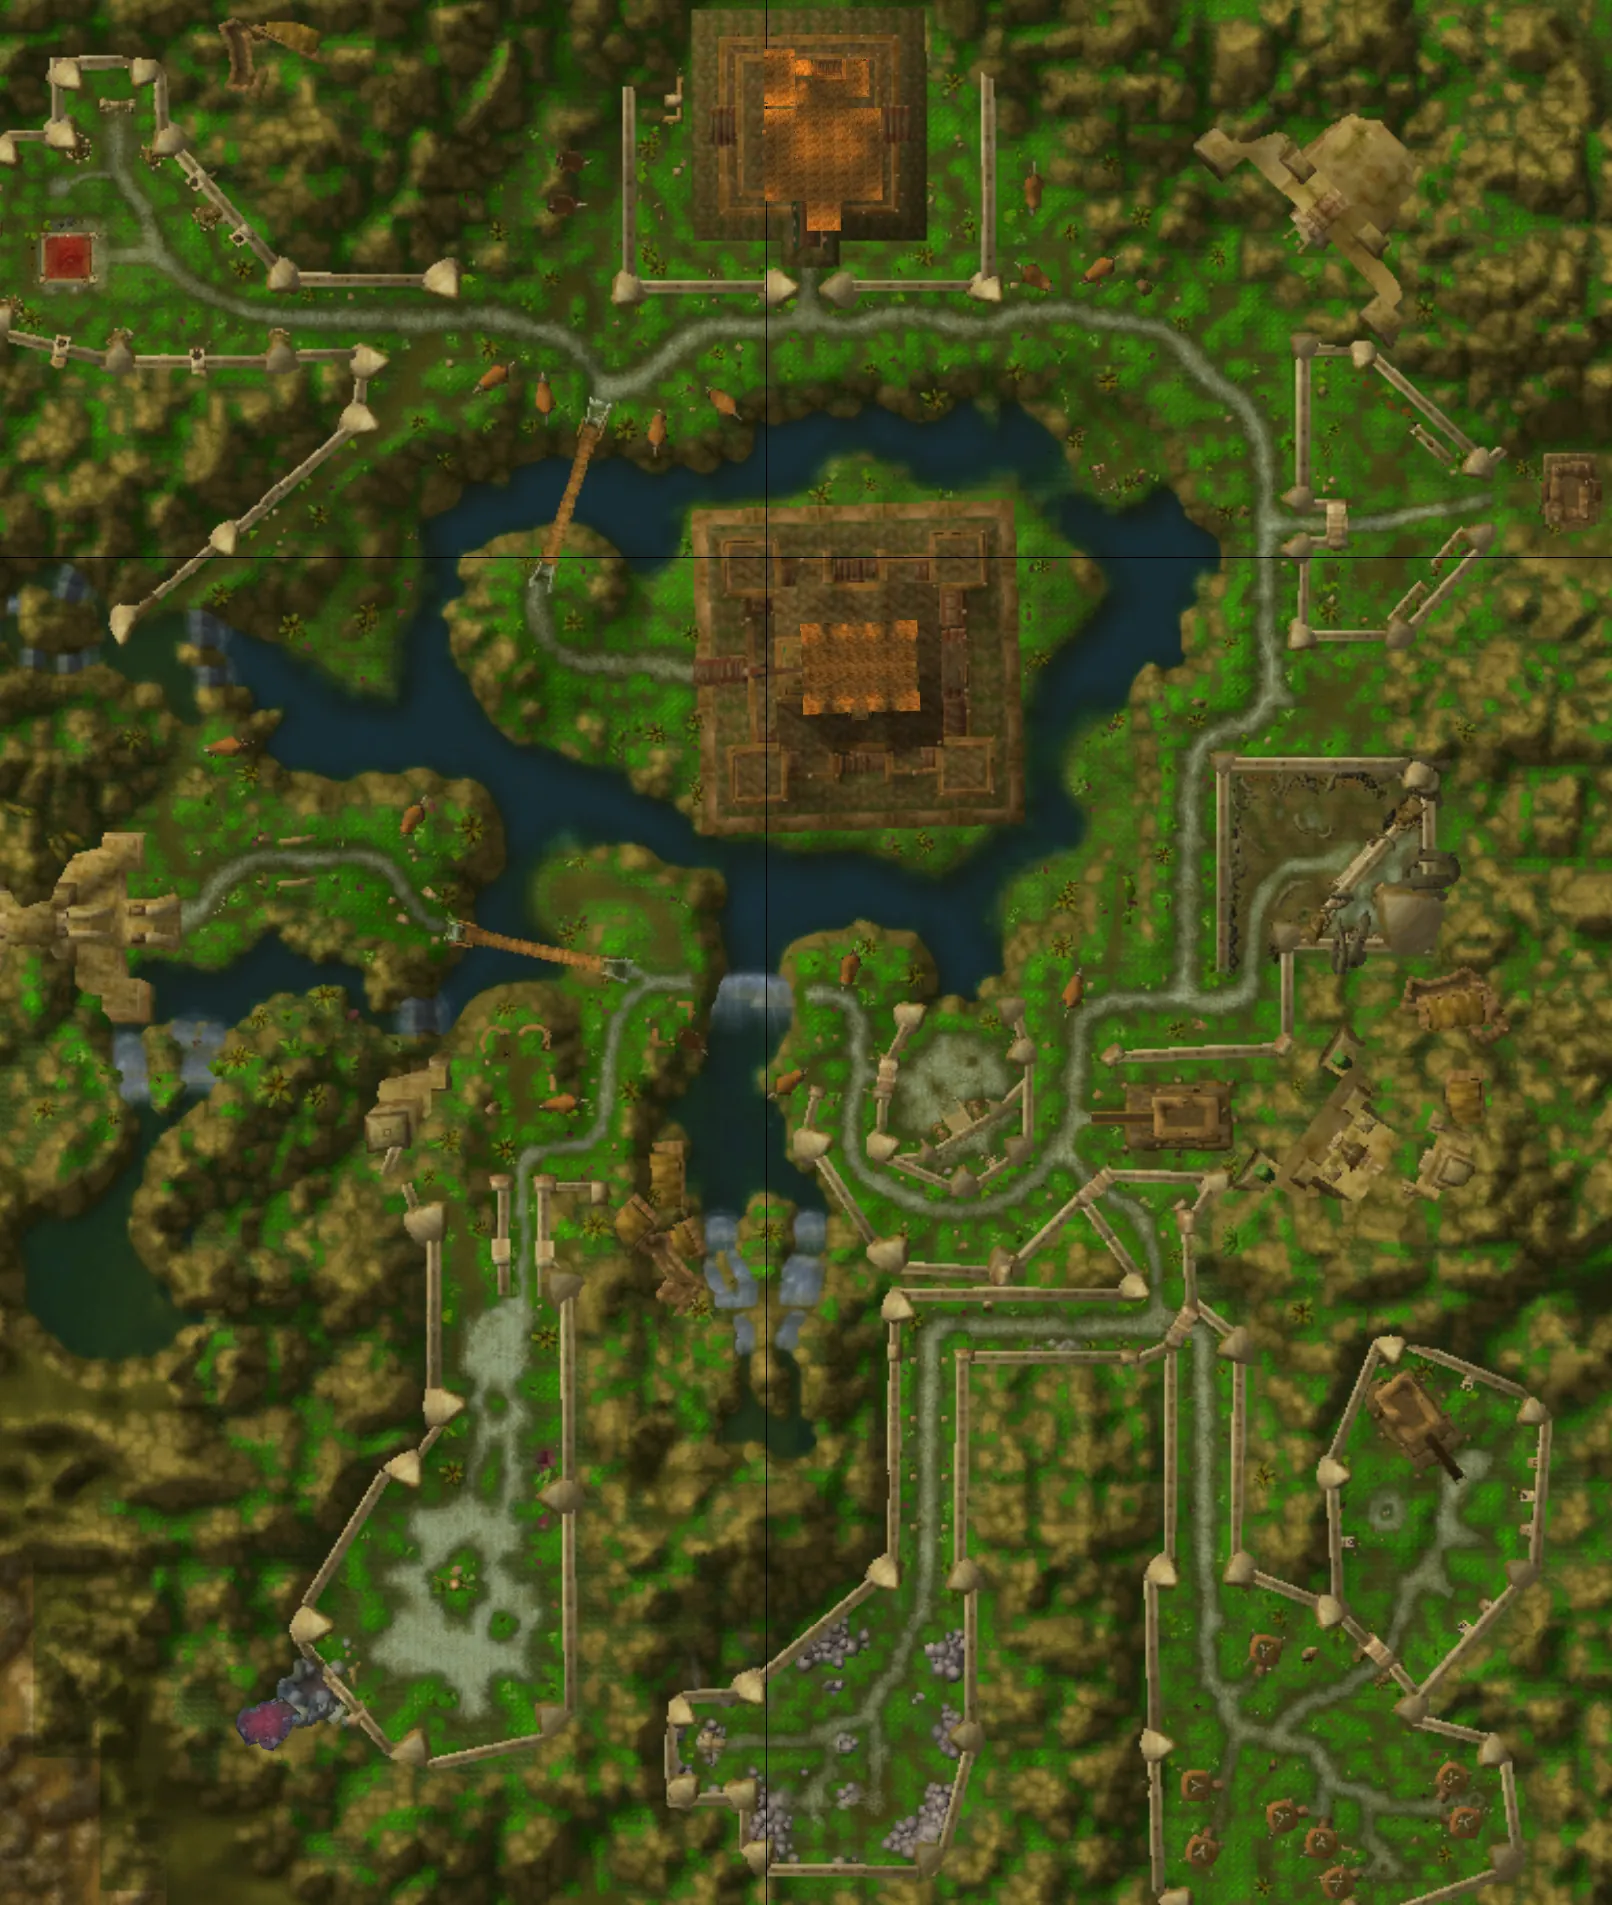
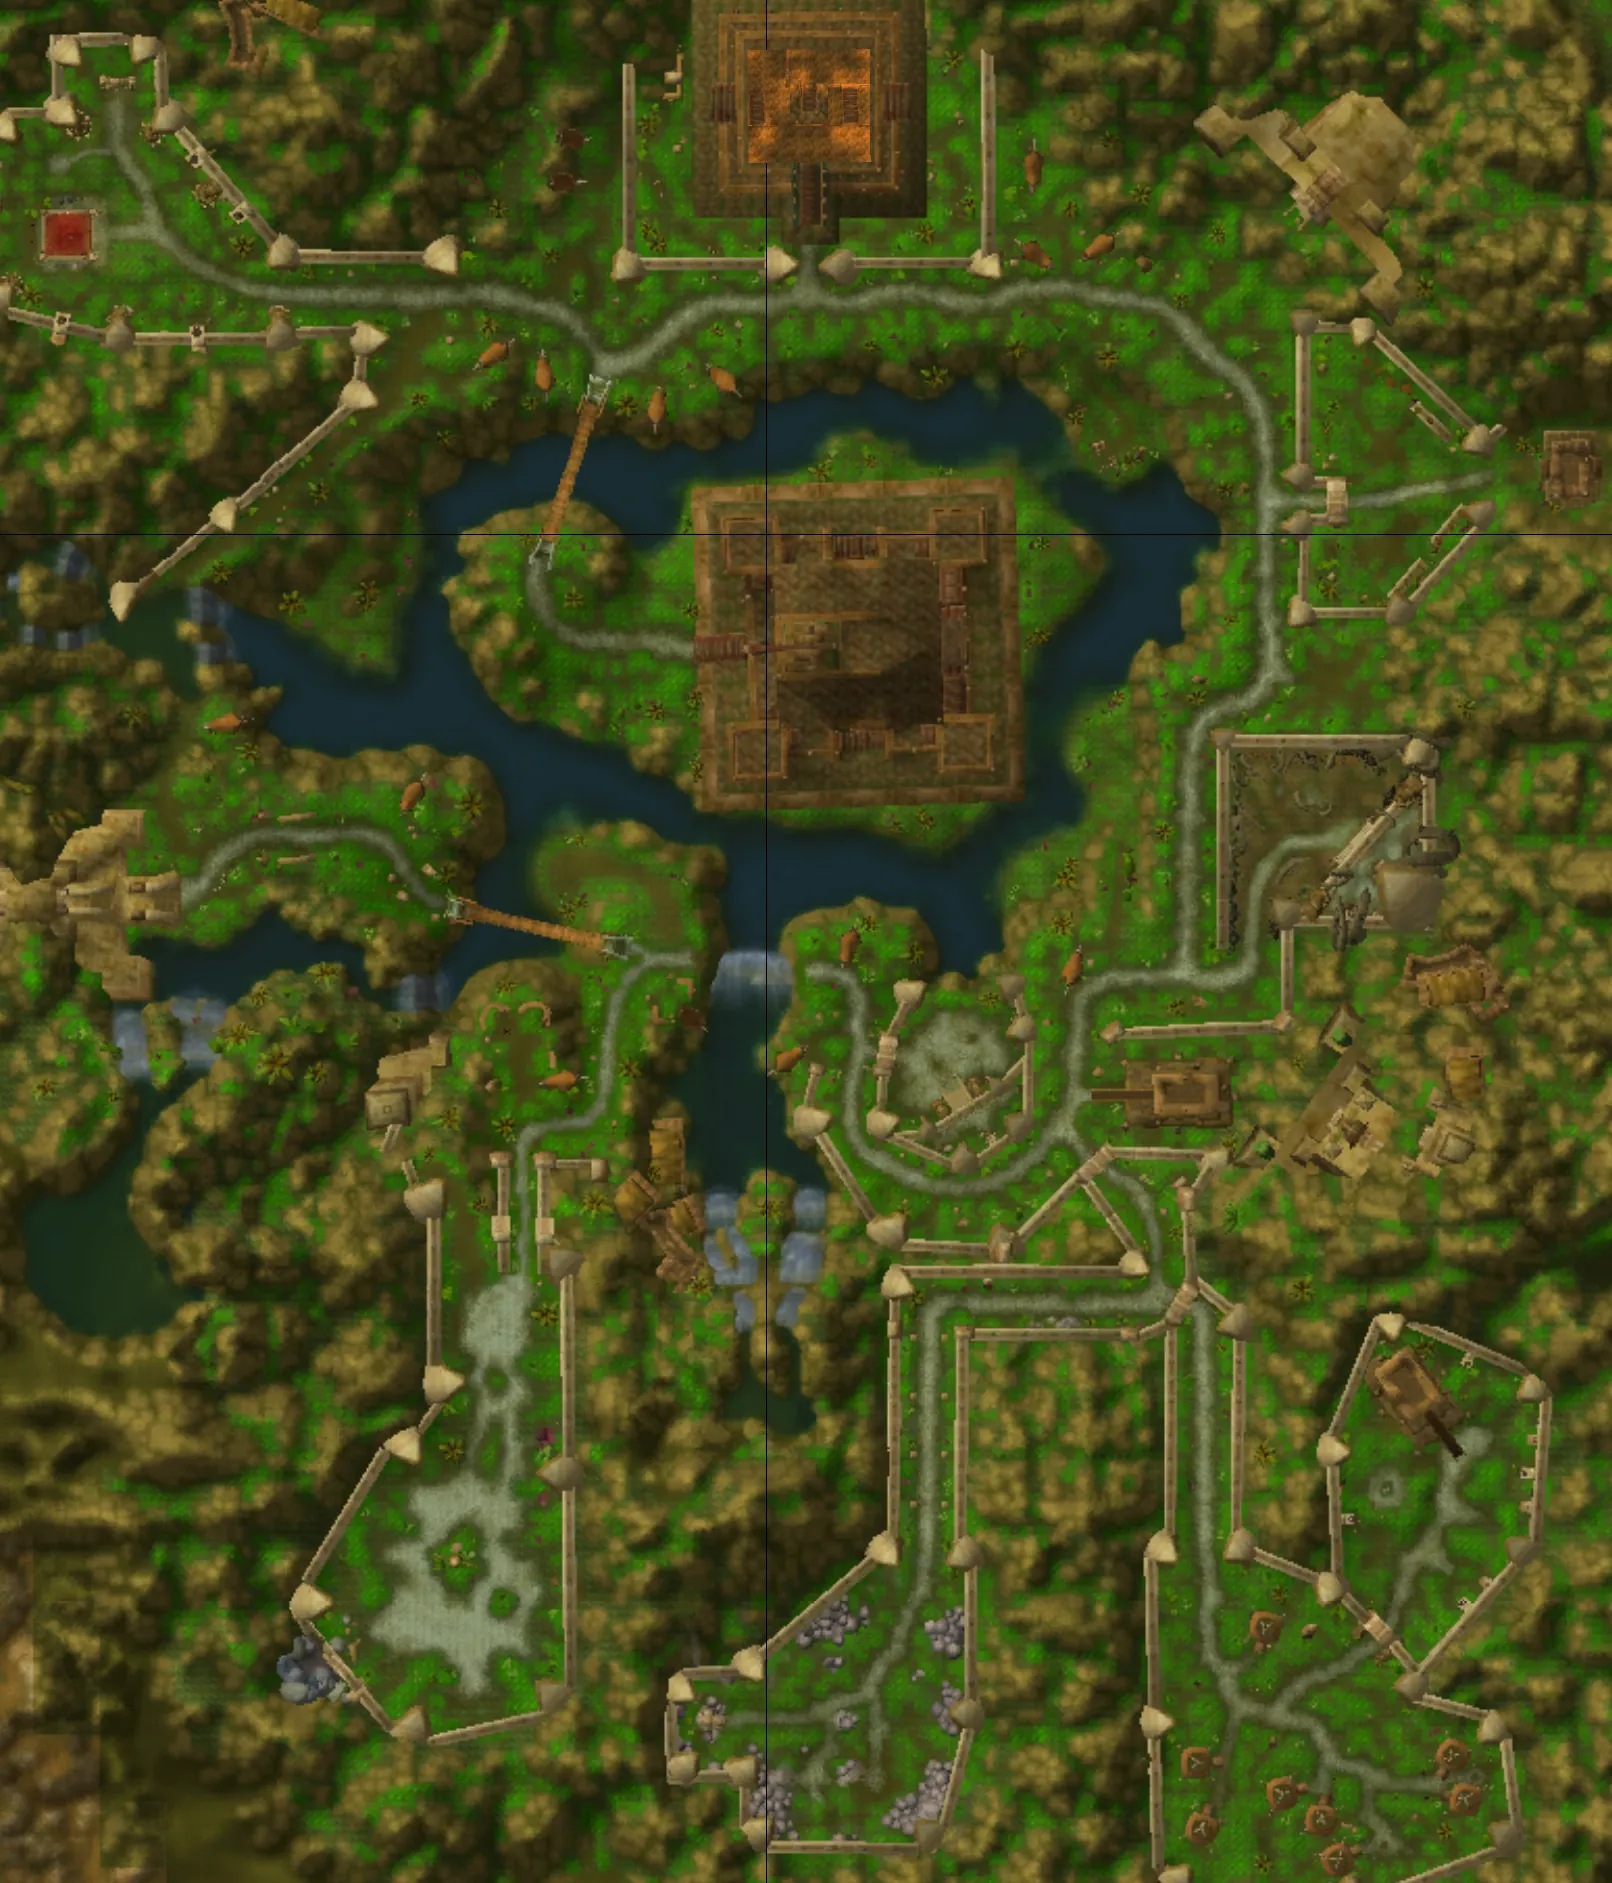
A map of Zul'Gurub with 2 floors (Part 1: High Priestess Jeklik, High Priest Venoxis ..., Part 2: Jin'do the Hexxer), stitched from the Forever client's own minimap art (Forever client), with the bosses numbered in the order the client gives (their spots are Classic spawn data until players confirm them in Forever).
The map shows 246 packs of 592 mobs and 13 patrol paths, 72 of the packs marked high danger, with what each pack holds, what to watch for and suggested marks (Classic data from CMaNGOS: Forever may have moved them).
How to run it
How Classic's Zul'Gurub plays, from well-established Classic strategy. Blizzard's raid overview of 20 October names three raids for Forever: Barrow Deeps, Hyjal Summit and Onyxia's Lair. This one is in the game files, but Blizzard hasn't said if or when it comes.
A 20-player raid in the jungle trolls' city in Stranglethorn Vale, with ten bosses. Most fights have a second phase in which the boss changes form, and the five High Priests make Hakkar easier if you kill them first.
Before you go
- Level: Level 60.
- Group: 20 players in Classic: 2 to 3 tanks, 4 to 5 healers and the rest damage dealers.
- Getting in: In Classic the entrance is open to everyone: there is no attunement. It lies in northern Stranglethorn Vale.
- Resistance: Nature resistance helps on Venoxis and Mar'li. Frost resistance helps the tank on Gahz'ranka.
- Bring: Nature and fire protection potions for the priests' fights; Flasks or elixirs and food; Healing and mana potions
- Who you need: Interrupters or silences for Jeklik's heal; Priests and paladins to dispel; Hunters and rogues for add control; A mage or two to polymorph and remove curses
Trash
- Zul'Gurub has troll and snake packs between the priests: pull them in small groups.
- Kill the priests in the order you plan: the room for each boss opens in turn.
Bosses
10 bosses, in the client's order (Forever client).
1. High Priestess Jeklik
Jeklik fights as a bat, then as a troll below half health. Silences and bats in the first half, a big heal and fire on the ground in the second.
- Tank her facing away from the raid.
- In bat form she casts Sonic Burst and summons bats with Summon Frenzied Bloodseeker Bats: kill the bats.
- At about half health she turns troll: interrupt Great Heal and avoid the fire on the ground.
- Burn her down.
Tank
- Pierce Armor reduces your armour: heal through it and expect more physical damage.
- In troll form, pick her up when she lands.
Healers
- Sonic Burst silences you for 10 seconds: heal through it.
- Blood Leech drains health from players nearby: heal through it.
Damage dealers
- Interrupt Great Heal every time.
- Kill the bats from Summon Frenzied Bloodseeker Bats quickly.
- Stay out of the fire from Throw Liquid Fire.
What wipes groups
- A Great Heal that nobody interrupts.
- Bats overwhelming the healers.
Abilities
- Charge (Classic data): Charges an enemy, inflicting normal damage plus ? and stuns the opponent for 2 sec.
- Mark of Arlokk (Classic data)
- Sonic Burst (Classic data): Inflicts normal damage plus 1750 to 2250 on nearby enemies, preventing them from spellcasting for 10 sec.
- Summon Frenzied Bloodseeker Bats (Classic data)
- Blood Leech (Classic data): Drains 180 health from nearby enemies, healing the caster for up to three times the amount stolen. (Numbers at level 60; they grow with your level.)
- Pierce Armor (Classic data): Reduces an enemy's armor by 75% for 20 sec.
- Transform Visual (Classic data)
- Throw Liquid Fire (Classic data)
- Jeklik Transform (Classic data)
- Green Channeling (Classic data)
- Root Self (Classic data)
- Great Heal (Classic data): Calls upon Holy magic to heal an ally.
Tank tips (Classic data)
- Pick up 8 Frenzied Bloodseeker Bat that join about every 60 sec.
- Pick up 2 Gurubashi Bat Rider that join at 35% health.
Healer tips (Classic data)
- Sonic Burst hits everyone within 20 yards about every 10 sec.
Damage tips (Classic data)
- Charge: High Priestess Jeklik charges a random player about every 22 sec.
- 8 Frenzied Bloodseeker Bat join about every 60 sec: kill or crowd-control them.
- 2 Gurubashi Bat Rider join at 35% health: kill or crowd-control them.
Loot
- Primal Hakkari Bindings (Classic data, 15%)
- Primal Hakkari Armsplint (Classic data, 15%)
- Primal Hakkari Stanchion (Classic data, 15%)
- Primal Hakkari Girdle (Classic data, 15%)
- Primal Hakkari Sash (Classic data, 15%)
- Primal Hakkari Shawl (Classic data, 15%)
- Primal Hakkari Tabard (Classic data, 3%)
- Primal Hakkari Kossack (Classic data, 3%)
- Primal Hakkari Aegis (Classic data, 3%)
- Channeler's Head (Classic data, 100%)
2. High Priest Venoxis
Venoxis fights as a troll priest with Holy spells, then turns into a snake below half health and drops poison clouds. Interrupt and dispel in the first half, then keep moving.
- Tank him away from the raid.
- In troll form, dispel Renew and interrupt his holy spells.
- At about half health he changes to a snake: stay out of Poison Cloud and kill him fast.
Tank
- He hits with Thrash: he swings quickly, so keep your health up.
- In snake form, pick him up again as he changes position.
Healers
- Holy Nova hits the melee: heal through it.
- Poison Cloud deals 500 nature damage a second: leave it at once.
Damage dealers
- Dispel Renew and Dispel Magic when you can.
- Move out of Poison Cloud immediately.
What wipes groups
- Raiders standing in Poison Cloud.
- Healers failing to dispel Holy Fire.
Abilities
- Dispel Magic (Classic data): Dispels magic on an ally, removing 1 harmful spell.
- Renew (Classic data): Heals an ally every 3 sec. for 15 sec.
- Holy Wrath (Classic data)
- Holy Nova (Classic data): Causes an explosion of divine light, inflicting 875 to 1125 Holy damage to nearby enemies and reducing the caster's threat level until cancelled.
- Holy Fire (Classic data): Consumes an enemy in flames, burning it and inflicting additional Fire damage every 2 sec. over 8 sec.
- Thrash (Classic data): Gives the caster 2 extra attacks.
- Venoxis Transform (Classic data)
- Poison Cloud (Classic data): Inflicts 500 Nature damage to nearby enemies every 1 sec. for 10 sec.
- Virulent Poison Proc (Classic data)
- Enrage (Classic data): Increases the caster's attack speed by 50% and the Physical damage it deals by 219 to 281 for 10 min.
Tank tips (Classic data)
- Venoxis Transform: High Priest Venoxis hits harder; save your defensive cooldowns for it.
- Enrage: High Priest Venoxis hits harder below 20% health; save your defensive cooldowns for it.
- Pick up 4 Razzashi Cobra that join when the fight starts.
Healer tips (Classic data)
- Holy Wrath hits the tank about every 20 sec.
- Holy Nova hits everyone within 15 yards about every 12 sec.
- Expect more damage on the tank during Venoxis Transform.
- Move out of Poison Cloud.
Damage tips (Classic data)
- Interrupt Holy Fire (3.5 sec cast, Fire damage on one player).
- Move out of Poison Cloud.
- 4 Razzashi Cobra join when the fight starts: kill or crowd-control them.
Loot
- Primal Hakkari Bindings (Classic data, 15%)
- Primal Hakkari Armsplint (Classic data, 15%)
- Primal Hakkari Stanchion (Classic data, 15%)
- Primal Hakkari Girdle (Classic data, 15%)
- Primal Hakkari Sash (Classic data, 15%)
- Primal Hakkari Shawl (Classic data, 15%)
- Primal Hakkari Tabard (Classic data, 3%)
- Primal Hakkari Kossack (Classic data, 3%)
- Primal Hakkari Aegis (Classic data, 3%)
- Channeler's Head (Classic data, 100%)
- Venoxis's Venom Sac (Classic data, 100%)
3. High Priestess Mar'li
Mar'li begins as a troll priestess with spider eggs around her, then turns into a spider at half health. Kill the spiders that hatch and keep her out of the raid.
- Tank her facing away from the raid.
- Kill the spiders that hatch from the eggs (Hatch Spider Egg) as they appear.
- At about half health she turns into a spider: tank her and burn her down.
Tank
- Charge stuns you for a moment: be ready.
- Pick up the spiders that hatch and bring them to the main group.
Healers
- Drain Life drains 3500 health from a player over 7 seconds: heal them through it.
- Poison Bolt Volley hits several players: top them up.
Damage dealers
- Kill the spiders quickly, then return to Mar'li.
- Enveloping Webs roots you and stops casting: get free or use your cleanse.
What wipes groups
- Spiders overwhelming the group.
- Players stuck in Enveloping Webs while spiders attack.
Abilities
- Poison Bolt Volley (Classic data): Shoots poison at an enemy, inflicting Nature damage, then additional damage every 2 sec. for 10 sec.
- Drain Life (Classic data): Drains 3500 health from an enemy over 7 sec., transferring it to the caster.
- Hatch Spider Egg (Classic data)
- Enlarge (Classic data): Increases the Physical damage dealt by an ally by 50 for 1 min.
- Thrash (Classic data): Gives the caster 2 extra attacks.
- Mar'li Transform (Classic data)
- Transform Visual (Classic data)
- Charge (Classic data): Charges an enemy, inflicting normal damage plus ? and stuns the opponent for 2 sec.
- Hatch Eggs (Classic data)
- Enveloping Webs (Classic data): Immobilizes an enemy, increases the time between its attacks by 100%, and prevents it from casting spells for 8 sec.
Healer tips (Classic data)
- Poison Bolt Volley damages the whole group about every 15 sec.
- Drain Life puts a magic debuff on a random player about every 35 sec: remove it if your class can.
Loot
- Primal Hakkari Bindings (Classic data, 15%)
- Primal Hakkari Armsplint (Classic data, 15%)
- Primal Hakkari Stanchion (Classic data, 15%)
- Primal Hakkari Girdle (Classic data, 15%)
- Primal Hakkari Sash (Classic data, 15%)
- Primal Hakkari Shawl (Classic data, 15%)
- Primal Hakkari Tabard (Classic data, 3%)
- Primal Hakkari Kossack (Classic data, 3%)
- Primal Hakkari Aegis (Classic data, 3%)
- Channeler's Head (Classic data, 100%)
4. Bloodlord Mandokir
Bloodlord Mandokir rides in on his raptor Ohgan. He watches one player with Threatening Gaze: if that player acts, he charges and kills them, and every kill makes him stronger (Level Up). Chained spirits can bring the dead back (Revive).
- Most raids kill Ohgan first, then Mandokir.
- When Threatening Gaze is on you, stop everything: don't move, cast or attack until it ends.
- Dead players can be raised by the chained spirits around the area during the fight.
Tank
- He hits hard with Mortal Strike and Whirlwind: keep your healers close.
- Intimidating Shout fears the players near him: Fear Ward or Berserker Rage help.
Healers
- Mortal Strike cuts healing on the tank: keep them high before it lands.
- If the gaze is on you, stop casting until it ends.
Damage dealers
- Melee: step out during Whirlwind.
- If the gaze is on you, do nothing until it ends.
What wipes groups
- Gazed players acting and dying, so he levels up and hits harder.
Abilities
- Threatening Gaze (Classic data)
- Charge (Classic data): Charges an enemy, inflicting normal damage plus ? and stuns the opponent for 2 sec.
- Mortal Strike (Classic data): Inflicts 200% weapon damage and leaves the target wounded, reducing the effectiveness of any healing by 50% for 5 sec.
- Whirlwind (Classic data): Attacks nearby enemies in a whirlwind of steel that lasts 2 sec. and inflicts normal damage plus 654. (Numbers at level 60; they grow with your level.)
- Intimidating Shout (Classic data): Shouts at an enemy, paralyzing it with terror for 8 sec. and causing all other nearby enemies to flee in fear.
- Overpower (Classic data): Instantly overpowers an enemy, causing weapon damage plus 750. Can only be used after the target dodges. Overpower cannot be blocked, dodged, or parried.
- Summon Bloodlord's Raptor (Classic data)
- Despawn Chained Spirits (Classic data)
- Summon Player (Classic data): Summons an enemy player.
- Charge (Classic data)
- Level Up (Classic data)
- Revive (Classic data)
- Enrage (Classic data): Increases the caster's attack speed by 50% and the Physical damage it deals by 219 to 281 for 10 min.
Tank tips (Classic data)
- Pick up the Ohgan that joins about every 60 sec.
- Pick up the Chained Spirit that joins about every 60 sec.
Healer tips (Classic data)
- Mortal Strike hits the tank about every 15 sec.
- Intimidating Shout fears melee for 8 sec about every 22 sec.
- Overpower hits the tank about every 15 sec.
Damage tips (Classic data)
- Charge: Bloodlord Mandokir charges a random player about every 30 sec.
- The Ohgan joins about every 60 sec: kill or crowd-control it.
- The Chained Spirit joins about every 60 sec: kill or crowd-control it.
Loot
- Primal Hakkari Tabard (Classic data, 15%)
- Primal Hakkari Kossack (Classic data, 15%)
- Primal Hakkari Aegis (Classic data, 15%)
- Primal Hakkari Bindings (Classic data, 9.2%)
- Primal Hakkari Armsplint (Classic data, 9.2%)
- Primal Hakkari Stanchion (Classic data, 9.2%)
- Primal Hakkari Girdle (Classic data, 9.2%)
- Primal Hakkari Sash (Classic data, 9.2%)
- Primal Hakkari Shawl (Classic data, 9.2%)
- Swift Razzashi Raptor (Classic data, 2%)
- Primal Hakkari Idol (Classic data, 100%)
5. Edge of Madness
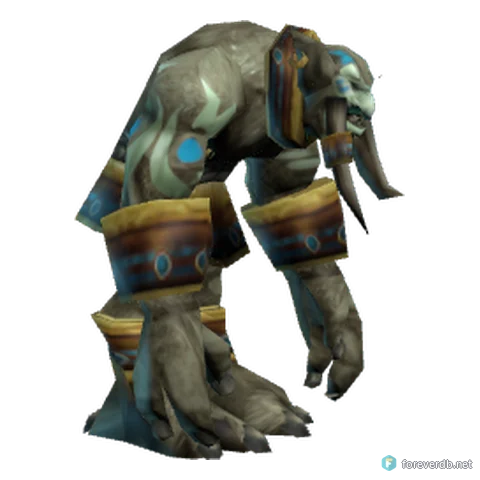
One of four brothers of the Edge of Madness comes forward: Gri'lek, Hazza'rah, Renataki or Wushoolay. Each has a different trick, so the raid learns all four.
- Find out which brother the raid is fighting and use the plan for that one.
- Gri'lek: stay out of Ground Tremor and watch for Avatar.
- Hazza'rah: kill the illusions from Summon Nightmare Illusions and watch for Chain Burn and Sleep.
- Renataki: expect Thousand Blades, Vanish and Gouge from stealth.
- Wushoolay: step out of Lightning Cloud.
Tank
- Hold the brother facing away from the raid.
- Renataki vanishes: pick him up when he reappears.
Healers
- Chain Burn burns mana: keep an eye on your own.
- Heal anyone hit by Lightning Cloud.
Damage dealers
- Move out of lightning on the ground.
- Kill Hazza'rah's illusions quickly.
What wipes groups
- Raiders standing in Lightning Cloud.
- A tank stunned by Ground Tremor with no one to pick up.
Abilities
- Avatar (Classic data)
- Ground Tremor (Classic data): Stuns nearby enemies, rendering them unable to move or attack for 2 sec.
- Chain Burn (Classic data): Hits an enemy with an anti-mana bolt that arcs to another nearby enemy. For each point of mana consumed by the bolt, the target takes 0.5 damage. The spell affects up to 3 targets.
- Sleep (Classic data): Puts nearby enemies to sleep for up to 6 sec. Any damage caused will awaken them.
- Earth Shock (Classic data): Shocks an enemy with concussive force, inflicting Nature damage and interrupting the spell being cast for 4 sec.
- Summon Nightmare Illusions (Classic data)
- Thousand Blades (Classic data)
- Vanish (Classic data)
- Gouge (Classic data): Inflicts 20 damage to an enemy and stuns it for up to 4 sec. You will automatically stop attacking. Target must be facing you. Any damage received by the stunned target will revive it.
- Thrash (Classic data): Gives the caster 2 extra attacks.
- Vanish (Classic data)
- Spirit Particles (green) (Classic data)
- Spawn - Red Lightning (Classic data)
- Lightning Cloud (Classic data): Creates a cloud of lightning that lasts 15 sec., blasting all enemies in a selected area for 657 to 843 Nature damage and inflicting 657 to 843 additional damage every 5 sec.
- Lightning Wave (Classic data): Strikes an enemy with a lightning bolt that arcs to another nearby enemy. The spell affects up to 10 targets, inflicting greater Nature damage to each successive target.
Tank tips (Classic data)
- Avatar: Edge of Madness hits harder; save your defensive cooldowns for it.
- Pick up the Nightmare Illusion that joins about every 20 sec.
Healer tips (Classic data)
- Expect more damage on the tank during Avatar.
- Ground Tremor stuns everyone for 2 sec about every 14 sec. It can't be removed: heal through it.
- Sleep stuns everyone for 6 sec about every 16 sec. It can't be removed: heal through it.
- Earth Shock hits the tank about every 12 sec.
Damage tips (Classic data)
- The Nightmare Illusion joins about every 20 sec: kill or crowd-control it.
- Ranged: stay more than 8 yards away (Gouge).
- Move out of Lightning Cloud.
Loot
- Gri'lek's Blood (Classic data, 100%)
6. High Priest Thekal
Thekal fights with two lieutenants, Lor'Khan and Zath. They resurrect each other, so the three must die close together. Once they're all dead, Thekal comes back as a tiger and the raid kills him again.
- Tank all three apart.
- Kill Lor'Khan and Zath with Thekal low: they must all die close together or the survivors resurrect the others with Resurrection.
- Thekal returns as a tiger: kill him quickly.
Tank
- Mortal Cleave cuts healing on you: swap if needed.
- Bloodlust makes an ally hit much faster: watch for it on your target.
Healers
- Silence silences you: have backup healers ready.
- Heal the tanks through Mortal Cleave and Bloodlust.
Damage dealers
- Kill the lieutenants first and time the kills together.
- Burn Thekal down when he turns tiger, before Enrage.
What wipes groups
- Killing one of the three without the others, so they come back.
- No answer to Silence on the healers.
Abilities
- Mortal Cleave (Classic data): Inflicts 150% weapon damage and leaves the target wounded, reducing the effectiveness of any healing by 50% for 5 sec.
- Bloodlust (Classic data): Increases an ally's attack speed by 75% for 30 sec.
- Silence (Classic data): Silences an enemy, preventing it from casting spells for 6 sec.
- Resurrection (Classic data)
- Thekal Transform (Classic data)
- Resurrection Impact Visual (Classic data)
- Enrage (Classic data): Increases the caster's attack speed by 60% and the Physical damage it deals by 118 for 2 min. (Numbers at level 60; they grow with your level.)
Tank tips (Classic data)
- Pick up 2 Zulian Tiger that join when the fight starts.
- Pick up the Zealot Zath that joins when the fight starts.
- Pick up the Zealot Lor'Khan that joins when the fight starts.
Healer tips (Classic data)
- Mortal Cleave hits the tank about every 18 sec.
- Silence puts a magic debuff on a random player about every 22 sec: remove it if your class can.
Damage tips (Classic data)
- 2 Zulian Tiger join when the fight starts: kill or crowd-control them.
- The Zealot Zath joins when the fight starts: kill or crowd-control it.
- The Zealot Lor'Khan joins when the fight starts: kill or crowd-control it.
Loot
- Primal Hakkari Bindings (Classic data, 15%)
- Primal Hakkari Armsplint (Classic data, 15%)
- Primal Hakkari Stanchion (Classic data, 15%)
- Primal Hakkari Girdle (Classic data, 15%)
- Primal Hakkari Sash (Classic data, 15%)
- Primal Hakkari Shawl (Classic data, 15%)
- Primal Hakkari Tabard (Classic data, 3%)
- Primal Hakkari Kossack (Classic data, 3%)
- Primal Hakkari Aegis (Classic data, 3%)
- Swift Zulian Tiger (Classic data, 2%)
- Channeler's Head (Classic data, 100%)
7. Gahz'ranka
An optional boss from the lake. He breathes frost, which drains mana and slows, and slams with a knockback. A short fight that mostly asks for frost resistance on the tank.
- Tank him facing away from the raid.
- Stay out of his front: Frost Breath hits that cone.
- Heal the tank through his slam (Gahz'ranka Slam).
Tank
- Frost resistance helps against Frost Breath.
- Gahz'ranka Slam knocks you back: pick him up again.
Healers
- Frost Breath drains mana: watch your own.
- Keep players clear of Massive Geyser.
Damage dealers
- Stay out of his front and away from Massive Geyser.
- Burn him down.
What wipes groups
- Several players caught in Frost Breath with their mana drained.
Abilities
- Frost Breath (Classic data): Inflicts Frost damage to enemies in a cone in front of the caster, stealing their mana and reducing their movement speed for 10 sec.
- Gahz'ranka Slam (Classic data): Inflicts normal damage plus 250 to nearby enemies and knocks them back.
- Massive Geyser (Classic data)
Tank tips (Classic data)
- Face Gahz'ranka away from the group: Frost Breath hits a 90° cone in front of it about every 9 sec.
- Gahz'ranka wipes its threat list about every 27 sec: be ready to taunt.
Healer tips (Classic data)
- Gahz'ranka Slam hits everyone within 30 yards about every 16 sec.
Damage tips (Classic data)
- Attack from behind or the side (Frost Breath hits in front).
Loot
- Tome of Polymorph: Turtle (Classic data, 15%)
8. High Priestess Arlokk
Arlokk marks a player, then vanishes and sends panthers to hunt them. She fights as a troll priestess and as a panther. Watch the mark, kill the panthers and avoid pulling her back too fast.
- Tank her facing away from the raid.
- When she marks a player with Mark of Arlokk, she and her panthers hunt them: that player stays close to the group.
- Kill the panthers from Summon Zulian Prowlers as they arrive.
- When she vanishes, wait before attacking.
Tank
- Gouge stuns you: be ready for a swap.
- She resets threat after she reappears (Hate to Zero): taunt at once.
Healers
- Dispel Shadow Word: Pain on anyone who gets it.
- The marked player takes extra attacks: heal them.
Damage dealers
- Kill the panthers quickly.
- Stay out of her way while she is panther.
What wipes groups
- The marked player dying while panthers are loose.
- Not taunting her after she resets threat.
Abilities
- Shadow Word: Pain (Classic data): Utters a word of darkness, inflicting Shadow damage to an enemy every 3 sec. for 18 sec.
- Mark of Arlokk (Classic data)
- Gouge (Classic data): Inflicts 20 damage to an enemy and stuns it for up to 4 sec. You will automatically stop attacking. Target must be facing you. Any damage received by the stunned target will revive it.
- Transform Visual (Classic data)
- Arlokk Transform (Classic data)
- Hate to Zero (Classic data)
- Summon Zulian Prowlers (Classic data)
- Super Invis (Classic data)
Tank tips (Classic data)
- Pick up the Zulian Prowler that joins about every 60 sec.
Healer tips (Classic data)
- Shadow Word: Pain puts a magic debuff on a random player about every 15 sec: remove it if your class can.
- Gouge hits the tank about every 22 sec.
Damage tips (Classic data)
- The Zulian Prowler joins about every 60 sec: kill or crowd-control it.
Loot
- Primal Hakkari Bindings (Classic data, 15%)
- Primal Hakkari Armsplint (Classic data, 15%)
- Primal Hakkari Stanchion (Classic data, 15%)
- Primal Hakkari Girdle (Classic data, 15%)
- Primal Hakkari Sash (Classic data, 15%)
- Primal Hakkari Shawl (Classic data, 15%)
- Primal Hakkari Tabard (Classic data, 3%)
- Primal Hakkari Kossack (Classic data, 3%)
- Primal Hakkari Aegis (Classic data, 3%)
- Panther Hide Sack (Classic data, 17%)
- Channeler's Head (Classic data, 100%)
9. Jin'do the Hexxer
Jin'do curses players with Delusions of Jin'do so they see Shades that only they can fight, turns the tank into a frog with Hex, and drops healing wards and Brain Wash Totems. Kill the totems the moment they appear, then Jin'do.
- Tank Jin'do; ranged players kill each Powerful Healing Ward and Summon Brain Wash Totem as soon as it drops.
- Players with Delusions of Jin'do fight the Shade that comes for them; the Shades only hurt cursed players.
- Anyone sent into the pit below has to fight their way back up the stairs.
Tank
- Hex turns you into a frog: a second tank holds him until it's dispelled.
Healers
- Dispel Hex from the tank at once.
- Watch the cursed players fighting Shades.
Damage dealers
- Kill Summon Brain Wash Totem at once: it mind-controls a player near it.
- Kill Powerful Healing Ward as soon as it lands: it heals Jin'do quickly.
What wipes groups
- A Brain Wash Totem left up and mind-controlling players.
- A healing ward left up so he heals back.
Abilities
- Delusions of Jin'do (Classic data)
- Hex (Classic data): Transforms an enemy into a frog, rendering it unable to attack or cast spells for 5 sec.
- Powerful Healing Ward (Classic data): Summons a ward that lasts 4 min. and periodically heals allies in an area around it.
- Summon Brain Wash Totem (Classic data)
- Banish (Classic data)
Tank tips (Classic data)
- Pick up 1000 Powerful Healing Ward that join about every 75 sec.
- Pick up 4000 Brain Wash Totem that join about every 22 sec.
Healer tips (Classic data)
- Delusions of Jin'do puts a curse debuff on a player who isn't the tank about every 8 sec: remove it if your class can.
- Hex fears tank for 5 sec about every 16 sec.
Damage tips (Classic data)
- 1000 Powerful Healing Ward join about every 75 sec: kill or crowd-control them.
- 4000 Brain Wash Totem join about every 22 sec: kill or crowd-control them.
Loot
- Jin'do's Judgement (Classic data, 17%)
- Primal Hakkari Tabard (Classic data, 15%)
- Primal Hakkari Kossack (Classic data, 15%)
- Primal Hakkari Aegis (Classic data, 15%)
- Primal Hakkari Bindings (Classic data, 9.2%)
- Primal Hakkari Armsplint (Classic data, 9.2%)
- Primal Hakkari Stanchion (Classic data, 9.2%)
- Primal Hakkari Girdle (Classic data, 9.2%)
- Primal Hakkari Sash (Classic data, 9.2%)
- Primal Hakkari Shawl (Classic data, 9.2%)
- Primal Hakkari Idol (Classic data, 100%)
10. Hakkar
Hakkar drains the raid with Blood Siphon about every 90 seconds and heals himself with it, unless the raid carries his poison: kill a Son of Hakkar and stand in its poison cloud before the siphon. Each High Priest left alive gives him its aspect.
- Kill as many of the five High Priests as you can first: each one alive gives him an aspect (Aspect of Jeklik, Aspect of Venoxis, Aspect of Mar'li, Aspect of Thekal, Aspect of Arlokk).
- Before each Blood Siphon, an off-tank pulls a Son of Hakkar; kill it and have the whole raid stand in its poison cloud. Poisoned players hurt Hakkar with the siphon instead of healing him.
- Stay a little spread: Corrupted Blood jumps from player to player.
- Kill him before he enrages (Enrage).
Tank
- Cause Insanity mind-controls a raider: crowd-control them, don't kill them.
- Off-tank: bring in a Son of Hakkar when the raid calls for it.
Healers
- Corrupted Blood spreads to anyone close and hurts: heal it and keep apart.
- Don't cure the Son's poison before the siphon: it's what protects the raid.
Damage dealers
- Kill the Son of Hakkar on call, then stand in its cloud until the siphon has gone off.
- A mind-controlled player is crowd-controlled, never killed.
What wipes groups
- A siphon with the raid not poisoned: he heals and the raid is drained.
- Corrupted Blood spreading through a raid standing together.
Abilities
- Blood Siphon (Classic data)
- Corrupted Blood (Classic data)
- Cause Insanity (Classic data): Drives an enemy target temporarily insane, speeding its attacks by 100% and its movement by 150%, as well as causing it to attack its own allies for 10 sec.
- Will of Hakkar (Classic data): Takes control of a humanoid enemy up to level 115 for 20 sec. (Numbers at level 60; they grow with your level.)
- Enrage (Classic data): Increases the caster's attack speed by 65% and the Physical damage it deals by 50 for 90 sec.
- Aspect of Jeklik (Classic data): Inflicts normal damage plus 1313 to 1687 on nearby enemies, preventing them from spellcasting for 5 sec.
- Aspect of Venoxis (Classic data): Spits poison at nearby enemies, inflicting Nature damage, then additional damage every 2 sec. for 10 sec.
- Aspect of Mar'li (Classic data)
- Aspect of Thekal (Classic data)
- Aspect of Arlokk (Classic data)
- Double Attack (Classic data): Gives the caster ? extra attacks.
- Hakkar Power (Classic data)
Tank tips (Classic data)
- Aspect of Thekal: Hakkar hits harder; save your defensive cooldowns for it.
Healer tips (Classic data)
- Corrupted Blood hits a player who isn't the tank about every 38 sec.
- Aspect of Jeklik damages the whole group about every 12 sec.
- Aspect of Venoxis damages the whole group about every 8 sec.
- Aspect of Mar'li stuns the tank for 6 sec about every 10 sec. It can't be removed: keep the tank topped up.
Damage tips (Classic data)
- Cause Insanity takes control of a player for 10 sec: crowd-control them rather than hurting them.
- Will of Hakkar takes control of a player for 20 sec: crowd-control them rather than hurting them.
Loot
- Heart of Hakkar (Classic data, 100%)
Quests
Confront Yeh'kinya (level 58)
Speak with Yeh'kinya.
Get it from: Prospector Ironboot, Tanaris (66.9, 24.0). (Classic data)
A Bijou for Zanza (level 60)
Destroy any one of the Hakkari Bijous found in Zul'Gurub at the Altar of Zanza on Yojamba Isle. When done, speak with Vinchaxa nearby.
Get it from: Vinchaxa, Stranglethorn Vale (14.5, 15.8). (Classic data)
A Collection of Heads (level 60)
String 5 Channeler's Heads, then return the Collection of Troll Heads to Exzhal on Yojamba Isle.
Get it from: Exzhal, Stranglethorn Vale (15.3, 15.5). (Classic data)
Enchanted South Seas Kelp (level 60)
Get it from: Maywiki of Zuldazar, Stranglethorn Vale (15.3, 16.0). (Classic data)
Enchanted South Seas Kelp (level 60)
Get it from: Maywiki of Zuldazar, Stranglethorn Vale (15.3, 16.0). (Classic data)
Enchanted South Seas Kelp (level 60)
Get it from: Maywiki of Zuldazar, Stranglethorn Vale (15.3, 16.0). (Classic data)
Kezan's Taint (level 60)
Get it from: Al'tabim the All-Seeing, Stranglethorn Vale (15.3, 16.1). (Classic data)
Kezan's Taint (level 60)
Get it from: Al'tabim the All-Seeing, Stranglethorn Vale (15.3, 16.1). (Classic data)
Kezan's Taint (level 60)
Get it from: Al'tabim the All-Seeing, Stranglethorn Vale (15.3, 16.1). (Classic data)
Kezan's Unstoppable Taint (level 60)
Get it from: Al'tabim the All-Seeing, Stranglethorn Vale (15.3, 16.1). (Classic data)
Nat's Measuring Tape (level 60)
Return Nat's Measuring Tape to Nat Pagle in Dustwallow Marsh.
Get it from: unknown. (Classic data)
Paragons of Power: The Augur's Belt (level 60)
Bring Maywiki of Zuldazar a Primal Hakkari Girdle. You must also have a reputation equal to or greater than Honored with the Zandalar Tribe. Maywiki of Zuldazar is located on Yojamba Isle, Stranglethorn Vale.
Get it from: Maywiki of Zuldazar, Stranglethorn Vale (15.3, 16.0). (Classic data)
Paragons of Power: The Augur's Bracers (level 60)
Bring Maywiki of Zuldazar a Primal Hakkari Armsplint. You must also have a reputation equal to or greater than Friendly with the Zandalar Tribe. Maywiki of Zuldazar is located on Yojamba Isle, Stranglethorn Vale.
Get it from: Maywiki of Zuldazar, Stranglethorn Vale (15.3, 16.0). (Classic data)
Paragons of Power: The Augur's Hauberk (level 60)
Bring Maywiki of Zuldazar a Primal Hakkari Tabard. You must also have a reputation equal to or greater than Revered with the Zandalar Tribe. Maywiki of Zuldazar is located on Yojamba Isle, Stranglethorn Vale.
Get it from: Maywiki of Zuldazar, Stranglethorn Vale (15.3, 16.0). (Classic data)
Paragons of Power: The Confessor's Bindings (level 60)
Bring Al'tabim the All-Seeing a Primal Hakkari Sash. You must also have a reputation equal to or greater than Honored with the Zandalar Tribe. Al'tabim the All-Seeing is located on Yojamba Isle, Stranglethorn Vale.
Get it from: Al'tabim the All-Seeing, Stranglethorn Vale (15.3, 16.1). (Classic data)
Paragons of Power: The Confessor's Mantle (level 60)
Bring Al'tabim the All-Seeing a Primal Hakkari Aegis. You must also have a reputation equal to or greater than Revered with the Zandalar Tribe. Al'tabim the All-Seeing is located on Yojamba Isle, Stranglethorn Vale.
Get it from: Al'tabim the All-Seeing, Stranglethorn Vale (15.3, 16.1). (Classic data)
Paragons of Power: The Confessor's Wraps (level 60)
Bring Al'tabim the All-Seeing a Primal Hakkari Stanchion. You must also have a reputation equal to or greater than Friendly with the Zandalar Tribe. Al'tabim the All-Seeing is located on Yojamba Isle, Stranglethorn Vale.
Get it from: Al'tabim the All-Seeing, Stranglethorn Vale (15.3, 16.1). (Classic data)
Paragons of Power: The Demoniac's Mantle (level 60)
Bring Al'tabim the All-Seeing a Primal Hakkari Sash. You must also have a reputation equal to or greater than Honored with the Zandalar Tribe. Al'tabim the All-Seeing is located on Yojamba Isle, Stranglethorn Vale.
Get it from: Al'tabim the All-Seeing, Stranglethorn Vale (15.3, 16.1). (Classic data)
Paragons of Power: The Demoniac's Robes (level 60)
Bring Al'tabim the All-Seeing a Primal Hakkari Kossack. You must also have a reputation equal to or greater than Revered with the Zandalar Tribe. Al'tabim the All-Seeing is located on Yojamba Isle, Stranglethorn Vale.
Get it from: Al'tabim the All-Seeing, Stranglethorn Vale (15.3, 16.1). (Classic data)
Paragons of Power: The Demoniac's Wraps (level 60)
Bring Al'tabim the All-Seeing a Primal Hakkari Stanchion. You must also have a reputation equal to or greater than Friendly with the Zandalar Tribe. Al'tabim the All-Seeing is located on Yojamba Isle, Stranglethorn Vale.
Get it from: Al'tabim the All-Seeing, Stranglethorn Vale (15.3, 16.1). (Classic data)
Paragons of Power: The Haruspex's Belt (level 60)
Bring Maywiki of Zuldazar a Primal Hakkari Sash. Maywiki of Zuldazar is located on Yojamba Isle, Stranglethorn Vale. You must also be Honored with Zandalar.
Get it from: Maywiki of Zuldazar, Stranglethorn Vale (15.3, 16.0). (Classic data)
Paragons of Power: The Haruspex's Bracers (level 60)
Bring Maywiki of Zuldazar a Primal Hakkari Stanchion. You must also have a reputation equal to or greater than Friendly with the Zandalar Tribe. Maywiki of Zuldazar is located on Yojamba Isle, Stranglethorn Vale.
Get it from: Maywiki of Zuldazar, Stranglethorn Vale (15.3, 16.0). (Classic data)
Paragons of Power: The Haruspex's Tunic (level 60)
Bring Maywiki of Zuldazar a Primal Hakkari Tabard. Maywiki of Zuldazar is located on Yojamba Isle, Stranglethorn Vale. You must also be Revered with Zandalar.
Get it from: Maywiki of Zuldazar, Stranglethorn Vale (15.3, 16.0). (Classic data)
Paragons of Power: The Illusionist's Mantle (level 60)
Bring Al'tabim the All-Seeing a Primal Hakkari Shawl. You must also have a reputation equal to or greater than Honored with the Zandalar Tribe. Al'tabim the All-Seeing is located on Yojamba Isle, Stranglethorn Vale.
Get it from: Al'tabim the All-Seeing, Stranglethorn Vale (15.3, 16.1). (Classic data)
Paragons of Power: The Illusionist's Robes (level 60)
Bring Al'tabim the All-Seeing a Primal Hakkari Kossack. You must also have a reputation equal to or greater than Revered with the Zandalar Tribe. Al'tabim the All-Seeing is located on Yojamba Isle, Stranglethorn Vale.
Get it from: Al'tabim the All-Seeing, Stranglethorn Vale (15.3, 16.1). (Classic data)
Paragons of Power: The Illusionist's Wraps (level 60)
Bring Al'tabim the All-Seeing Primal Hakkari Bindings. You must also have a reputation equal to or greater than Friendly with the Zandalar Tribe. Al'tabim the All-Seeing is located on Yojamba Isle, Stranglethorn Vale.
Get it from: Al'tabim the All-Seeing, Stranglethorn Vale (15.3, 16.1). (Classic data)
Paragons of Power: The Madcap's Bracers (level 60)
Bring Falthir the Sightless a Primal Hakkari Armsplint. You must also have a reputation equal to or greater than Friendly with the Zandalar Tribe. Falthir the Sightless is located on Yojamba Isle, Stranglethorn Vale.
Get it from: Falthir the Sightless, Stranglethorn Vale (14.1, 13.7). (Classic data)
Paragons of Power: The Madcap's Mantle (level 60)
Bring Falthir the Sightless a Primal Hakkari Girdle. You must also have a reputation equal to or greater than Honored with the Zandalar Tribe. Falthir the Sightless is located on Yojamba Isle, Stranglethorn Vale.
Get it from: Falthir the Sightless, Stranglethorn Vale (14.1, 13.7). (Classic data)
Paragons of Power: The Madcap's Tunic (level 60)
Bring Falthir the Sightless a Primal Hakkari Aegis. You must also have a reputation equal to or greater than Revered with the Zandalar Tribe. Falthir the Sightless is located on Yojamba Isle, Stranglethorn Vale.
Get it from: Falthir the Sightless, Stranglethorn Vale (14.1, 13.7). (Classic data)
Paragons of Power: The Predator's Belt (level 60)
Bring the following Paragons of Power from Zul'Gurub to Falthir the Sightless: A Primal Hakkari Shawl. You must also have a reputation equal to or greater than Honored with the Zandalar Tribe. Falthir the Sightless is located on Yojamba Isle, Stranglethorn Vale.
Get it from: Falthir the Sightless, Stranglethorn Vale (14.1, 13.7). (Classic data)
Paragons of Power: The Predator's Bracers (level 60)
Bring the following Paragons of Power from Zul'Gurub to Falthir the Sightless: A Primal Hakkari Bindings. You must also have a reputation equal to or greater than Friendly with the Zandalar Tribe. Falthir the Sightless is located on Yojamba Isle, Stranglethorn Vale.
Get it from: Falthir the Sightless, Stranglethorn Vale (14.1, 13.7). (Classic data)
Paragons of Power: The Predator's Mantle (level 60)
Bring the following Paragons of Power from Zul'Gurub to Falthir the Sightless: A Primal Hakkari Aegis. You must also have a reputation equal to or greater than Revered with the Zandalar Tribe. Falthir the Sightless is located on Yojamba Isle, Stranglethorn Vale.
Get it from: Falthir the Sightless, Stranglethorn Vale (14.1, 13.7). (Classic data)
Paragons of Power: The Vindicator's Armguards (level 60)
Bring Jin'rokh the Breaker a Primal Hakkari Armsplint. You must also have a reputation equal to or greater than Friendly with the Zandalar Tribe. Jin'rokh the Breaker is located on Yojamba Isle, Stranglethorn Vale.
Get it from: Jin'rokh the Breaker, Stranglethorn Vale (15.3, 14.4). (Classic data)
Paragons of Power: The Vindicator's Belt (level 60)
Bring Jin'rokh the Breaker a Primal Hakkari Girdle. You must also have a reputation equal to or greater than Honored with the Zandalar Tribe. Jin'rokh the Breaker is located on Yojamba Isle, Stranglethorn Vale.
Get it from: Jin'rokh the Breaker, Stranglethorn Vale (15.3, 14.4). (Classic data)
Paragons of Power: The Vindicator's Breastplate (level 60)
Bring Jin'rokh the Breaker a Primal Hakkari Kossack. You must also have a reputation equal to or greater than Revered with the Zandalar Tribe. Jin'rokh the Breaker is located on Yojamba Isle, Stranglethorn Vale.
Get it from: Jin'rokh the Breaker, Stranglethorn Vale (15.3, 14.4). (Classic data)
Pristine Enchanted South Seas Kelp (level 60)
Get it from: Maywiki of Zuldazar, Stranglethorn Vale (15.3, 16.0). (Classic data)
Strength of Mount Mugamba (level 60)
Get it from: Jin'rokh the Breaker, Stranglethorn Vale (15.3, 14.4). (Classic data)
Strength of Mount Mugamba (level 60)
Get it from: Jin'rokh the Breaker, Stranglethorn Vale (15.3, 14.4). (Classic data)
Strength of Mount Mugamba (level 60)
Get it from: Jin'rokh the Breaker, Stranglethorn Vale (15.3, 14.4). (Classic data)
The All-Seeing Eye of Zuldazar (level 60)
Get it from: Al'tabim the All-Seeing, Stranglethorn Vale (15.3, 16.1). (Classic data)
The Eye of Zuldazar (level 60)
Get it from: Al'tabim the All-Seeing, Stranglethorn Vale (15.3, 16.1). (Classic data)
The Eye of Zuldazar (level 60)
Get it from: Al'tabim the All-Seeing, Stranglethorn Vale (15.3, 16.1). (Classic data)
The Eye of Zuldazar (level 60)
Get it from: Al'tabim the All-Seeing, Stranglethorn Vale (15.3, 16.1). (Classic data)
The Heart of Hakkar (level 60)
Bring the Heart of Hakkar to Molthor on Yojamba Isle.
Get it from: unknown. (Classic data)
The Heathen's Brand (level 60, Alliance)
Get it from: Jin'rokh the Breaker, Stranglethorn Vale (15.3, 14.4). (Classic data)
The Heathen's Brand (level 60, Alliance)
Get it from: Jin'rokh the Breaker, Stranglethorn Vale (15.3, 14.4). (Classic data)
The Heathen's Brand (level 60, Alliance)
Get it from: Jin'rokh the Breaker, Stranglethorn Vale (15.3, 14.4). (Classic data)
The Hero's Brand (level 60, Alliance)
Get it from: Jin'rokh the Breaker, Stranglethorn Vale (15.3, 14.4). (Classic data)
The Jewel of Kajaro (level 60)
Get it from: Al'tabim the All-Seeing, Stranglethorn Vale (15.3, 16.1). (Classic data)
The Maelstrom's Tendril (level 60)
Get it from: Falthir the Sightless, Stranglethorn Vale (14.1, 13.7). (Classic data)
The Maelstrom's Tendril (level 60)
Get it from: Falthir the Sightless, Stranglethorn Vale (14.1, 13.7). (Classic data)
The Maelstrom's Tendril (level 60)
Get it from: Falthir the Sightless, Stranglethorn Vale (14.1, 13.7). (Classic data)
The Maelstrom's Wrath (level 60)
Get it from: Falthir the Sightless, Stranglethorn Vale (14.1, 13.7). (Classic data)
The Pebble of Kajaro (level 60)
Get it from: Al'tabim the All-Seeing, Stranglethorn Vale (15.3, 16.1). (Classic data)
The Pebble of Kajaro (level 60)
Get it from: Al'tabim the All-Seeing, Stranglethorn Vale (15.3, 16.1). (Classic data)
The Pebble of Kajaro (level 60)
Get it from: Al'tabim the All-Seeing, Stranglethorn Vale (15.3, 16.1). (Classic data)
The Perfect Poison (level 60)
Dirk Thunderwood at Cenarion Hold wants you to bring him Venoxis's Venom Sac and Kurinnaxx's Venom Sac.
Get it from: Dirk Thunderwood, Silithus (52.1, 39.1). (Classic data)
The Rage of Mount Mugamba (level 60)
Get it from: Jin'rokh the Breaker, Stranglethorn Vale (15.3, 14.4). (Classic data)
The Unmarred Vision of Voodress (level 60, Horde)
Get it from: Maywiki of Zuldazar, Stranglethorn Vale (15.3, 16.0). (Classic data)
Vision of Voodress (level 60, Horde)
Get it from: Maywiki of Zuldazar, Stranglethorn Vale (15.3, 16.0). (Classic data)
Vision of Voodress (level 60, Horde)
Get it from: Maywiki of Zuldazar, Stranglethorn Vale (15.3, 16.0). (Classic data)
Vision of Voodress (level 60, Horde)
Get it from: Maywiki of Zuldazar, Stranglethorn Vale (15.3, 16.0). (Classic data)
Zandalarian Shadow Mastery Talisman (level 60)
Get it from: Falthir the Sightless, Stranglethorn Vale (14.1, 13.7). (Classic data)
Zandalarian Shadow Talisman (level 60)
Get it from: Falthir the Sightless, Stranglethorn Vale (14.1, 13.7). (Classic data)
Zandalarian Shadow Talisman (level 60)
Get it from: Falthir the Sightless, Stranglethorn Vale (14.1, 13.7). (Classic data)
Zandalarian Shadow Talisman (level 60)
Get it from: Falthir the Sightless, Stranglethorn Vale (14.1, 13.7). (Classic data)
Paragons of Power: The Freethinker's Armguards (level 61)
Bring Jin'rokh the Breaker Primal Hakkari Bindings. You must also have a reputation equal to or greater than Friendly with the Zandalar Tribe. Jin'rokh the Breaker is located on Yojamba Isle, Stranglethorn Vale.
Get it from: Jin'rokh the Breaker, Stranglethorn Vale (15.3, 14.4). (Classic data)
Paragons of Power: The Freethinker's Belt (level 61)
Bring Jin'rokh the Breaker a Primal Hakkari Shawl. You must also have a reputation equal to or greater than Honored with the Zandalar Tribe. Jin'rokh the Breaker is located on Yojamba Isle, Stranglethorn Vale.
Get it from: Jin'rokh the Breaker, Stranglethorn Vale (15.3, 14.4). (Classic data)
Paragons of Power: The Freethinker's Breastplate (level 61)
Bring Jin'rokh the Breaker a Primal Hakkari Tabard. You must also have a reputation equal to or greater than Revered with the Zandalar Tribe. Jin'rokh the Breaker is located on Yojamba Isle, Stranglethorn Vale.
Get it from: Jin'rokh the Breaker, Stranglethorn Vale (15.3, 14.4). (Classic data)
Heart of Hakkar: this item starts a quest.
Videos
- Wait WHAT?! MAJOR Class Reworks, Forever Console Rumors & China’s P2W Bundles | WoW Forever by The Comeback Kids
- Blizzard Circled This Zone. Here’s What’s There... | WoW Forever by Ebonhardt
- Which ruleset should I play in WoW Forever? by Ryan Geldun
- Blizzard Listened: Every Rogue Change in WoW Forever by Skook
Read more
Other raids for these levels
- Onyxia's Lair (levels 60)
- Molten Core (levels 60)
- Blackwing Lair (levels 60)
- Ruins of Ahn'Qiraj (levels 60)
- Ahn'Qiraj Temple (levels 60)
- Naxxramas (levels 60)
Sources
The WoW Forever client (build 1.60.1.70938), what players' ForeverDB addons saw in Forever, Blizzard's posts, and for Classic instances CMaNGOS classic-db (GPL-3.0), labelled Classic data.
Not known yet
- No drops seen in Forever yet. The ForeverDB addon records them as you play.
- Dungeon map: boss spots are Classic spawns (CMaNGOS); Forever may have moved them.