

이 페이지는 아직 번역되지 않았습니다. 영어 버전
Uldaman
Uldaman is a level 41–51 dungeon in Badlands in World of Warcraft: Forever, with 8 bosses.
Dungeon. Levels 41–51 (Forever client: group finder). 5 players (Forever client). Enter from level 30.
Getting there
- Entrance: Badlands (35.2, 10.3) (Forever client)
- Nearest flight master (Horde): Kargath, Badlands
Map
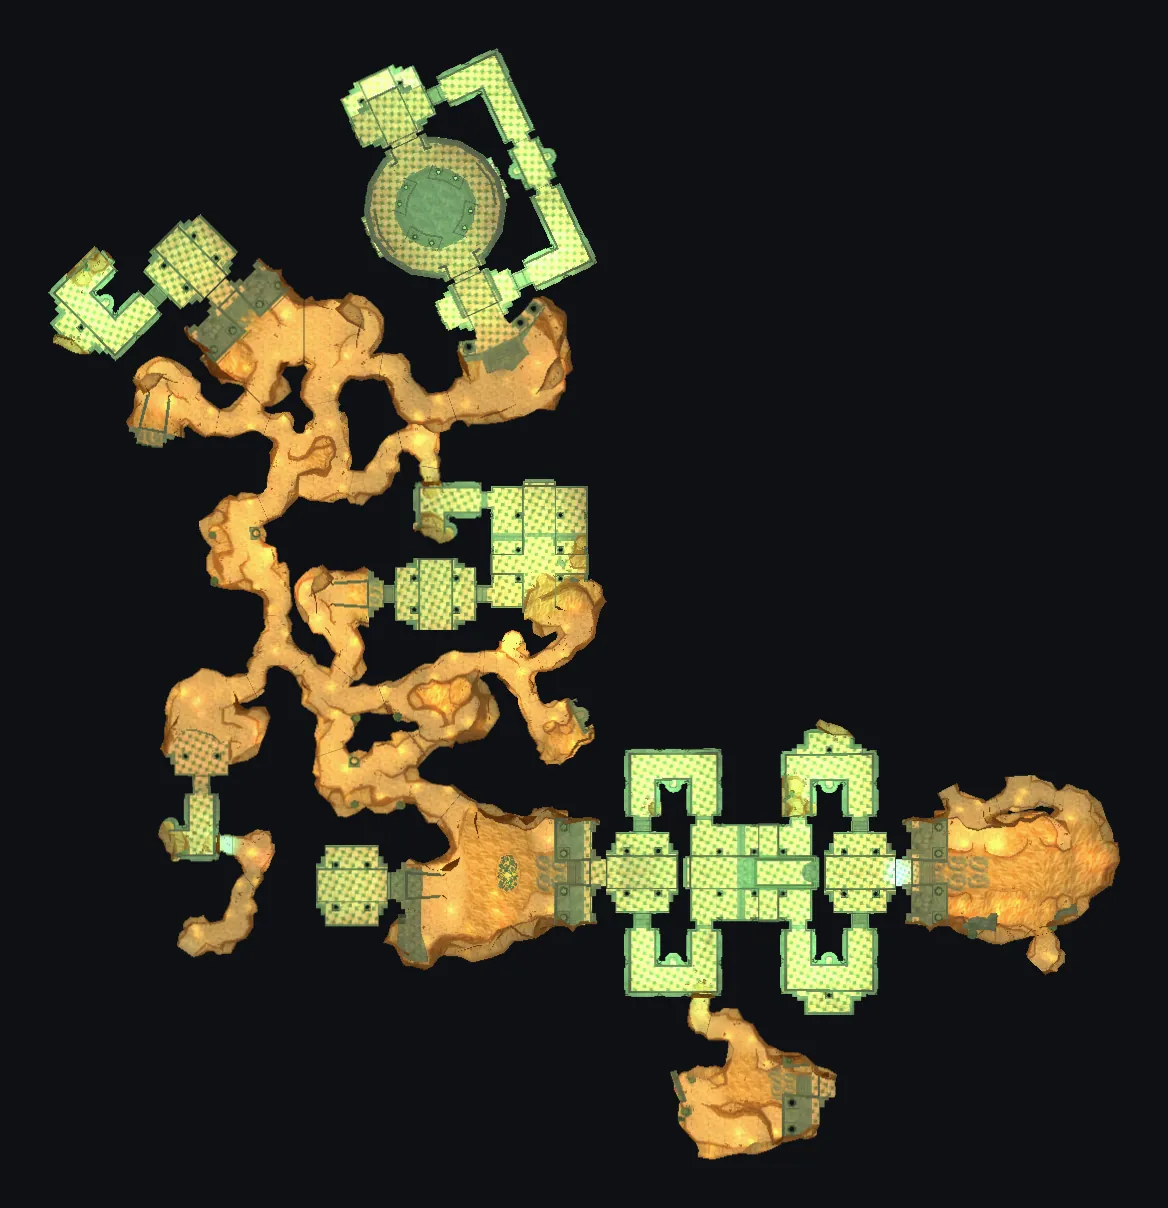
A map of Uldaman with 1 floor, stitched from the Forever client's own minimap art (Forever client), with the bosses numbered in the order the client gives (their spots are Classic spawn data until players confirm them in Forever).
The map shows 133 packs of 301 mobs and 5 patrol paths, 22 of the packs marked high danger, with what each pack holds, what to watch for and suggested marks (Classic data from CMaNGOS: Forever may have moved them).
Players now have access to Razorfen Downs (25+) and Uldaman (30+), in addition to the following, already available, dungeons:
Worth it for: Worn Running Boots (top pick for Beast Mastery Hunter and 2 more specs at level 40); Stoneweaver Leggings (top pick for Discipline Priest and 2 more specs at level 40); Baelog's Shortbow (top pick for Protection Warrior at level 40).
How to run it
How Classic's Uldaman plays, from well-established Classic strategy. It is not yet checked against Forever's own version of the fights.
A Titan vault under the Badlands, run by five players in their low 40s. It is a long dungeon of dwarves and stone creatures with a few easy casters early on and a final boss whose room fills with awakened guardians.
Before you go
- Level: Level 41 to 51 in Classic, with 35 recommended. Most groups come at 40 to 45.
- Group: 5 players.
- Getting in: The entrance is in the Badlands. Kargath is the nearest Horde flight point.
- Bring: Food and drink for the long trash pulls
- Who you need: A tank who can hold several adds at once; A healer with mana for the long fights; Crowd control for the dwarves and casters; Interrupts for the lightning casters
- Also: Ironaya sits behind a door that, in Classic, opens with the Staff of Prehistoria: a quest puts it together from the Shaft of Tsol (Revelosh drops it) and the Gni'kiv Medallion. The notes below are per boss, not in route order.
Trash
- Uldaman is long: pull in small groups and rest after each boss.
- Use crowd control on the dwarf casters and kill the lightning casters first.
- There are two entrances: the way you come in affects the route, so decide before you start.
Bosses
8 bosses, in the client's order (Forever client).
1. Revelosh
A shaman-type boss near the start of the dungeon. He casts lightning and chain lightning.
- Pull him with the tank in front and the group spread out a little.
- Interrupt his chain lightning.
- Take the Shaft of Tsol he drops: it's part of the Staff of Prehistoria you need for Ironaya.
Tank
- Hold him still: his lightning bolt goes at you about every few seconds.
Healers
- Lightning Bolt hits the tank about every 4 seconds: keep the tank topped up.
Damage dealers
- Interrupt Chain Lightning: it arcs to up to three targets.
- Spread out so that the chain doesn't have far to jump.
What wipes groups
- A group stacked together taking the full chain lightning.
Abilities
- Chain Lightning (Classic data): Strikes an enemy with a lightning bolt that arcs to another nearby enemy. The spell affects up to 3 targets, causing Nature damage to each.
- Lightning Bolt (Classic data): Blasts an enemy with lightning, inflicting Nature damage.
Healer tips (Classic data)
- Lightning Bolt hits the tank about every 4 sec.
Damage tips (Classic data)
- Interrupt Chain Lightning (3 sec cast, Nature damage on one player).
Loot
- Revelosh's Gloves (seen in WoW Forever)
- Revelosh's Boots (Classic data, 25%)
- Revelosh's Armguards (Classic data, 25%)
- Revelosh's Spaulders (Classic data, 25%)
2. The Lost Dwarves
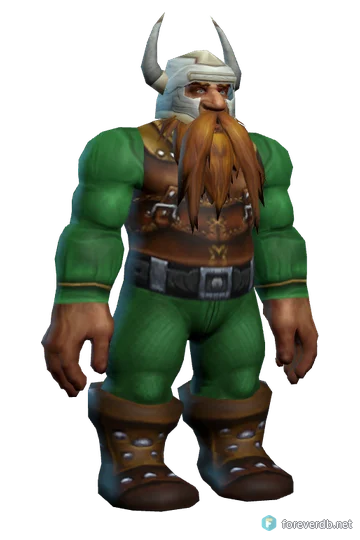
Three dwarves, Baelog, Eric and Olaf, who fight together. They hit hard, stun and shoot.
- Pull the three dwarves to the tank one by one if you can, or crowd-control one.
- Kill the shooter first.
- Stay near the tank so that healing reaches everyone.
Tank
- Hold all three if you can: they hit the tank rather than the healer when you keep threat up.
Healers
- Strike hits the tank about every 6 seconds and Shoot about every 3 seconds.
- Shield Slam stuns the tank: heal before it lands.
Damage dealers
- Kill the shooter first, then the others.
- Rushing Charge is a charge: don't stand in the open.
What wipes groups
- Pulling all three with no crowd control.
Abilities
- Strike (Classic data): Strikes at an enemy, inflicting increased melee damage.
- Shoot (Classic data): Shoots at an enemy, inflicting Physical damage.
- Shield Slam (Classic data): Inflicts 70 damage to an enemy, stunning it for 2 sec. (Numbers at level 60; they grow with your level.)
- Rushing Charge (Classic data): Increases the caster's movement speed by 119% for 3 sec. and causes it to inflict an additional 187 damage on its first attack. (Numbers at level 60; they grow with your level.)
Healer tips (Classic data)
- Strike hits the tank about every 6 sec.
- Shoot hits the tank about every 3 sec.
- Shield Slam hits the tank about every 11 sec.
Loot
- Baelog's Shortbow (Classic data, 90%)
- Nordic Longshank (Classic data, 10%)
- Precision Arrow (Classic data, 100%)
3. Ironaya
A stone giantess who sleeps behind a door. She hits in an arc in front and stomps the group.
- Use the Staff of Prehistoria to open her door.
- Tank her away from the group.
- Ranged players stay back: she stomps the melee.
Tank
- Face her away from the group: Arcing Smash hits a wide cone in front.
- Knock Away knocks back a player who isn't the tank, so a back-up taunt is useful.
Healers
- War Stomp hits everyone close to her: top the group up after it.
Damage dealers
- Stay behind or beside her.
- Ranged: stay more than 5 yards away so that War Stomp misses you.
What wipes groups
- A tank facing the group at her.
Abilities
- Arcing Smash (Classic data): Lashes out in a vicious arc, inflicting damage to enemies in a cone in front of the caster.
- Knock Away (Classic data): Inflicts normal damage plus 30 to an enemy and knocks it back.
- War Stomp (Classic data): Inflicts normal damage plus 31 to nearby enemies, knocking them back and stunning them for 5 sec. (Numbers at level 60; they grow with your level.)
Tank tips (Classic data)
- Face Ironaya away from the group: Arcing Smash hits a 90° cone in front of it about every 5 sec.
Healer tips (Classic data)
- Knock Away hits a player who isn't the tank about every 39 sec.
- War Stomp hits everyone within 5 yards about every 35 sec.
Damage tips (Classic data)
- Attack from behind or the side (Arcing Smash hits in front).
- Ranged: stay more than 5 yards away (War Stomp).
Loot
- Ironshod Bludgeon (seen in WoW Forever)
- Stoneweaver Leggings (Classic data, 40%)
- Ironaya's Bracers (Classic data, 40%)
4. Obsidian Sentinel
A stone guardian who sends out obsidian shards as he loses health.
- Pull him with the tank ready for four rounds of adds.
- Kill each Obsidian Shard as it joins.
- Return to the Sentinel.
Tank
- Pick up each Obsidian Shard when Summon Obsidian Shard sends it at 80%, 60%, 40% and 20% health.
Healers
- Splintered Obsidian lowers the damage players deal: expect a longer fight and keep your mana up.
Damage dealers
- Kill the shards first: each one joins at a set health point.
What wipes groups
- Shards left alive, so adds pile up.
Abilities
- Summon Obsidian Shard (Classic data)
- Splintered Obsidian (Classic data)
Tank tips (Classic data)
- Pick up the Obsidian Shard that joins at 80% health.
- Pick up the Obsidian Shard that joins at 60% health.
- Pick up the Obsidian Shard that joins at 40% health.
- Pick up the Obsidian Shard that joins at 20% health.
Damage tips (Classic data)
- The Obsidian Shard joins at 80% health: kill or crowd-control it.
- The Obsidian Shard joins at 60% health: kill or crowd-control it.
- The Obsidian Shard joins at 40% health: kill or crowd-control it.
- The Obsidian Shard joins at 20% health: kill or crowd-control it.
Loot
- Obsidian Power Source (Classic data, 100%)
5. Ancient Stone Keeper
A stone keeper who calls sand storms. Hold the storms and keep killing him.
- Pull him to a spot with space around.
- Kill each sand storm.
- Return to the Keeper.
Tank
- Pick up each Sand Storms storm as it joins.
Healers
- Keep the group up while the storms last 30 seconds.
Damage dealers
- Kill each storm as it joins, then go back to the Keeper.
What wipes groups
- Storms loose on the healer.
Abilities
- Sand Storms (Classic data): Summons 1 Sand Storm to aid the caster in battle for 30 sec.
Tank tips (Classic data)
- Pick up the Sand Storm that joins about every 38 sec.
Damage tips (Classic data)
- The Sand Storm joins about every 38 sec: kill or crowd-control it.
Loot
- Rockshard Pauldrons (seen in WoW Forever)
- Cragfists (Classic data, 50%)
6. Galgann Firehammer
A dark iron dwarf with fire spells. Stay spread out for his fire nova and watch the fire resistance debuff.
- Pull him and keep the group a little apart.
- Ranged players stay beyond 10 yards.
- Kill him.
Tank
- Flame Lash lowers your fire resistance and Amplify Flames raises your fire damage taken: use cooldowns when both are on you.
Healers
- Flame Shock is damage over time on the tank about every 13 seconds.
- Fire Nova hits everyone within 10 yards.
Damage dealers
- Ranged: stay more than 10 yards away from Fire Nova.
What wipes groups
- A healer low on mana while the tank has both fire debuffs.
Abilities
- Amplify Flames (Classic data): Increases the Fire damage taken by an enemy by 100 for 30 sec.
- Flame Lash (Classic data): Burns an enemy for 55 to 63 damage and reduces its Fire resistance by 35 for 45 sec. (Numbers at level 60; they grow with your level.)
- Flame Shock (Classic data): Instantly sears the target with fire, causing 95 Fire damage immediately and 96 Fire damage over 12 sec.
- Fire Nova (Classic data): Inflicts Fire damage to nearby enemies.
Healer tips (Classic data)
- Flame Lash hits the tank about every 17 sec.
- Flame Shock hits the tank about every 13 sec.
- Fire Nova hits everyone within 10 yards about every 11 sec.
Damage tips (Classic data)
- Ranged: stay more than 10 yards away (Fire Nova).
Loot
- Emberscale Cape (seen in WoW Forever)
- Galgann's Fireblaster (Classic data, 20%)
- Galgann's Firehammer (Classic data, 20%)
- Flameseer Mantle (Classic data, 20%)
7. Grimlok
A trogg shaman who shrinks the group and puts down tremor totems. He casts lightning and chain bolt.
- Pull him with the tank ready for adds.
- Kill the totems when they land.
- Interrupt his chain bolt.
Tank
- Pick up the Tremor Totems that join about every minute.
Healers
- Lightning Bolt hits the tank about every 4 seconds.
- Shrink lowers the group's strength and stamina.
Damage dealers
- Interrupt Chain Bolt when you can.
- Kill Tremor Totem totems when they appear.
What wipes groups
- Chain bolt on a group stacked together.
Abilities
- Shrink (Classic data): Reduces nearby enemies' Strength by 42 and Stamina by 42 for 2 min. (Numbers at level 60; they grow with your level.)
- Tremor Totem (Classic data): Summons a Tremor Totem with 5 health at the feet of the caster that shakes the ground around it, removing Fear, Charm and Sleep effects from party members within 30 yards. Lasts 5 min.
- Chain Bolt (Classic data): Strikes an enemy with a lightning bolt that arcs to another nearby enemy. The spell affects up to 3 targets, causing 138 to 156 Nature damage to each.
- Lightning Bolt (Classic data): Blasts an enemy with lightning, inflicting Nature damage.
Tank tips (Classic data)
- Pick up 5 Tremor Totem that join about every 60 sec.
Healer tips (Classic data)
- Lightning Bolt hits the tank about every 4 sec.
Damage tips (Classic data)
- 5 Tremor Totem join about every 60 sec: kill or crowd-control them.
- Interrupt Chain Bolt (2.5 sec cast, Nature damage on one player).
Loot
- Oilskin Leggings (seen in WoW Forever)
- Grimlok's Tribal Vestments (Classic data, 40%)
- Grimlok's Charge (Classic data, 20%)
- Shattered Necklace Sapphire (Classic data, 100%)
8. Archaedas
The last boss, an ancient stone guardian. He wakes up stone dwarves and guardians around the room as the fight goes on.
- Start the fight at the edge of the vault: not in the middle of the sleeping dwarves.
- Kill each guardian that wakes, then the boss.
- Heal through the stuns.
Tank
- Hold the awakened dwarves and guardians as they arrive: ask for off-tank help.
Healers
- Ground Tremor stuns the group about every 12 seconds: heal through it.
Damage dealers
- Kill what wakes, then Archaedas.
- Don't pull sleeping dwarves you don't need.
What wipes groups
- The whole room awake at once.
Abilities
- Archaedas Awaken Visual (DND) (Classic data)
- Awaken Earthen Dwarf (Classic data)
- Ground Tremor (Classic data): Stuns nearby enemies, rendering them unable to move or attack for 2 sec.
- Freeze Anim (Classic data)
- Awaken Earthen Guardians (Classic data)
- Awaken Vault Warder (Classic data)
Healer tips (Classic data)
- Ground Tremor stuns everyone for 2 sec about every 12 sec. It can't be removed: heal through it.
Loot
- Archaedic Stone (seen in WoW Forever)
- The Rockpounder (Classic data, 20%)
- Stoneslayer (Classic data, 20%)
- Shattered Necklace Power Source (Classic data, 100%)
Loot from the dungeon
- Shattered Necklace (seen in WoW Forever)
- An'Alleum Power Stone (seen in WoW Forever)
- Horned Viking Helmet (Classic data)
- Worn Running Boots (Classic data)
- Battered Viking Shield (Classic data)
- Olaf's All Purpose Shield (Classic data)
Quests
A Sign of Hope (level 35, Alliance)
Find Hammertoe Grez in Uldaman.
Get it from: Prospector Ryedol, Badlands (53.4, 43.4). (seen in WoW Forever)
Power Stones (level 36)
Bring 8 Dentrium Power Stones and 8 An'Alleum Power Stones to Rigglefuzz in the Badlands.
Get it from: Rigglefuzz, Badlands (42.4, 52.8). (seen in WoW Forever)
Agmond's Fate (level 38, Alliance)
Bring 4 Carved Stone Urns to Prospector Ironband in Loch Modan.
Get it from: Prospector Ironband, Loch Modan (65.9, 65.6). (seen in WoW Forever)
Amulet of Secrets (level 40, Alliance)
Find Hammertoe's Amulet and return it to him in Uldaman.
Get it from: Hammertoe Grez, Badlands (37.8, 10.6); or Loch Modan (37.3, 85.8). (seen in WoW Forever)
Power in Uldaman (level 40)
Retrieve an Obsidian Power Source and bring it to Tabetha in Dustwallow Marsh.
Get it from: Tabetha, Dustwallow Marsh (46.1, 57.1). (Classic data)
Solution to Doom (level 40)
Bring the Tablet of Ryun'eh to Theldurin the Lost.
Get it from: Theldurin the Lost, Badlands (51.2, 76.7). (seen in WoW Forever)
The Hidden Chamber (level 40, Alliance)
Read Baelog's Journal, explore the hidden chamber, then report to Prospector Stormpike.
Get it from: Baelog. (seen in WoW Forever)
The Lost Dwarves (level 40, Alliance)
Find Baelog in Uldaman.
Get it from: Prospector Stormpike, Ironforge (74.6, 12.0). (seen in WoW Forever)
Lore for a Price (level 41, Alliance)
Bring five silver bars to Talvash del Kissel in Ironforge.
Get it from: Talvash del Kissel, Ironforge (36.0, 4.3). (seen in WoW Forever)
Necklace Recovery (level 41, Horde)
Look for a valuable necklace within the Uldaman dig site and bring it back to Dran Droffers in Orgrimmar. The necklace may be damaged.
Get it from: Dran Droffers, Orgrimmar (59.6, 36.5). (seen in WoW Forever)
Necklace Recovery, Take 2 (level 41, Horde)
Find a clue as to the gems' whereabouts in the depths of Uldaman.
Get it from: Dran Droffers, Orgrimmar (59.6, 36.5). (Classic data)
The Shattered Necklace (level 41, Alliance)
Search for the original creator of the shattered necklace to learn of its potential value.
Get it from: unknown. (seen in WoW Forever)
Back to Uldaman (level 42, Alliance)
Search for clues as to the current disposition of Talvash's necklace within Uldaman. The slain paladin he mentioned was the person who had it last.
Get it from: Talvash del Kissel, Ironforge (36.0, 4.3). (seen in WoW Forever)
Translating the Journal (level 42, Horde)
Find someone who can translate the paladin's journal. The closest location that might have someone is Kargath, in the Badlands.
Get it from: Remains of a Paladin. (Classic data)
Translating the Journal (level 42, Horde)
Let Jarkal borrow the necklace. In exchange, he will translate the journal for you.
Get it from: Jarkal Mossmeld, Badlands (2.4, 46.1). (Classic data)
Uldaman Reagent Run (level 42, Alliance)
Bring 12 Magenta Fungus Caps to Ghak Healtouch in Thelsamar.
Get it from: Ghak Healtouch, Loch Modan (37.1, 49.4). (Classic data)
Uldaman Reagent Run (level 42, Horde)
Bring 12 Magenta Fungus Caps to Jarkal Mossmeld in Kargath.
Get it from: Jarkal Mossmeld, Badlands (2.4, 46.1). (seen in WoW Forever)
Find the Gems (level 43, Alliance)
Find the ruby, sapphire, and topaz that are scattered throughout Uldaman. Once acquired, contact Talvash del Kissel remotely by using the Phial of Scrying he previously gave you. From the journal, you know... * The ruby has been stashed in a barricaded Shadowforge area. * The topaz has been hidden in an urn in one of the Trogg areas, near some Alliance dwarves. * The sapphire has been claimed by Grimlok, the trogg leader.
Get it from: Remains of a Paladin. (Classic data)
Reclaimed Treasures (level 43, Alliance)
Get Krom Stoutarm's treasured possession from his chest in the North Common Hall of Uldaman, and bring it to him in Ironforge.
Get it from: Krom Stoutarm, Ironforge (74.5, 9.9). (seen in WoW Forever)
Reclaimed Treasures (level 43, Horde)
Get Patrick Garrett's family treasure from their family chest in the South Common Hall of Uldaman, and bring it to him in the Undercity.
Get it from: Patrick Garrett, Undercity (62.8, 48.5). (seen in WoW Forever)
Deliver the Gems (level 44, Horde)
Deliver the Necklace and Gem Salvage to Dran Droffers in Orgrimmar.
Get it from: Jarkal Mossmeld, Badlands (2.4, 46.1). (Classic data)
Find the Gems and Power Source (level 44, Horde)
Recover all three gems and a power source for the necklace from Uldaman, and then bring them to Jarkal Mossmeld in Kargath. Jarkal believes a power source might be found on the strongest construct present in Uldaman. From the journal, you know... * The ruby has been stashed in a barricaded Shadowforge area. * The topaz has been hidden in an urn in one of the Trogg areas, near some Alliance dwarves. * The sapphire has been claimed by Grimlok, the trogg leader.
Get it from: Jarkal Mossmeld, Badlands (2.4, 46.1). (Classic data)
Necklace Recovery, Take 3 (level 44, Horde)
Visit Jarkal Mossmeld in Kargath to see if he was successful.
Get it from: Dran Droffers, Orgrimmar (59.6, 36.5). (Classic data)
Restoring the Necklace (level 44, Alliance)
Obtain a power source from the most powerful construct you can find in Uldaman, and deliver it to Talvash del Kissel in Ironforge.
Get it from: unknown. (Classic data)
Restoring the Necklace (level 44, Alliance)
Get it from: Talvash del Kissel, Ironforge (36.0, 4.3). (Classic data)
The Lost Tablets of Will (level 45, Alliance)
Find the Tablet of Will, and return them to Advisor Belgrum in Ironforge.
Get it from: Advisor Belgrum, Ironforge (77.3, 9.7). (Classic data)
The Platinum Discs (level 47)
Speak with stone watcher and learn what ancient lore it keeps. Once you have learned what lore it has to offer, activate the Discs of Norgannon.
Get it from: unknown. (seen in WoW Forever)
The Platinum Discs (level 47, Alliance)
Take the miniature version of the Discs of Norgannon to the Explorers' League in Ironforge.
Get it from: unknown. (seen in WoW Forever)
The Platinum Discs (level 47, Horde)
Take the miniature version of the Discs of Norgannon to the one of the sages in Thunder Bluff.
Get it from: unknown. (Classic data)
Shattered Necklace: this item starts a quest.
Videos
- WoW: Forever Journey EP.1 | Norway (ft. Guzu, Snupy & Stian Blipp) by World of Warcraft
- Every Final Boss from Classic by Stephenhero
- WoW Forever Lore Facts You NEVER Knew (Under 10 Minutes) by Haajix
- Everything You Need to Know About Enchanting in WoW Forever by We Ding Again
- WoW Forever Lore: The Story Behind Every Dungeon (All 9 New Ones Too) by Azeroth Herald | WoW Forever
- We Killed an Old God in Classic WoW… Should We Have? by Stephenhero
- WoW Forever Enchanting 1–300 FAST Leveling Guide | Trainers, Mats & Route by Doomsong Forever
Read more
- Blizzard's Forever Journey EP.1 in Norway, and the zones and dungeons it names
- WoW Forever Legacy system explained: every perk, challenge and reward
- Leveling in WoW Forever: where to go, from 1 to 60
- Leveling a Warrior to 30
- Leveling a Paladin to 30
- Leveling a Hunter to 30
- Leveling a Rogue to 30
- Leveling a Priest to 30
- Leveling a Shaman to 30
- Leveling a Mage to 30
- Leveling a Warlock to 30
- Leveling a Druid to 30
- Your first dungeon in WoW Forever
- The Legacy System in WoW Forever: how to earn your points and what to spend them on
Other dungeons for these levels
- Razorfen Downs (levels 37–46)
- Zul'Farrak (levels 44–54)
- Maraudon (levels 46–55)
- Sunken Temple (levels 50–60)
- Blackrock Depths (levels 52–60)
- Dire Maul (levels 54–60)
Sources
The WoW Forever client (build 1.60.1.70938), what players' ForeverDB addons saw in Forever, Blizzard's posts, and for Classic instances CMaNGOS classic-db (GPL-3.0), labelled Classic data.
Not known yet
- Dungeon map: boss spots are Classic spawns (CMaNGOS); Forever may have moved them.